If you’re trying to save section cuts to different scenes in SketchUp, there are a number of important things to keep in mind in order to have them appear the way you want them in the scene. This article will help you understand how to save section cuts to scenes.
 Section cuts allow you to “slice” through your model in order to hide parts of your model, or to create a cross section view. To insert a section cut, you use the Section tool. Holding SHIFT will lock orientation as you place your section plane. Once it’s placed, you can use the Move tool to change its position.
One solution to the common problems of section cuts is to not use section cuts at all! You can use the position camera tool to create a clipping plane through your model, eliminating the need to create a section cut in the first place. Watch my video tutorial on clipping planes here.
Watch the video, or continue reading below!
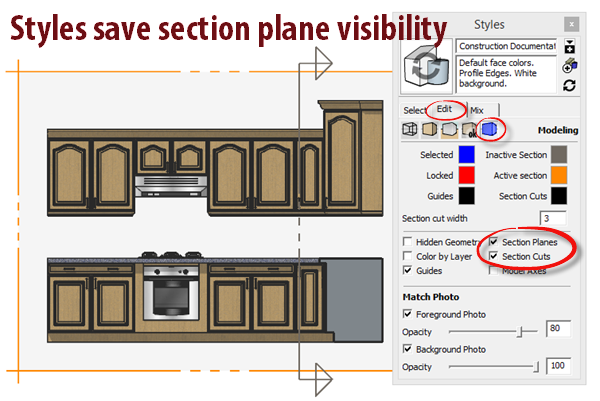
Styles control Section Plane visibility
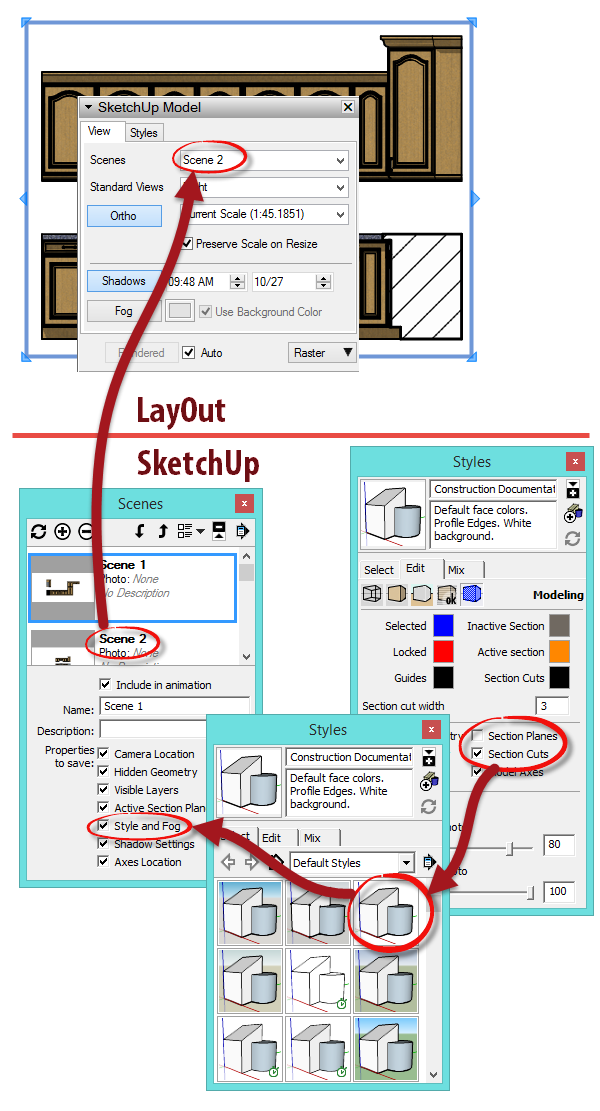
 If you are creating viewports in LayOut, you should be creating scenes in SketchUp to assign to those viewports. If you’re creating scenes in SketchUp, you should be assigning styles to those scenes in order to control how they look. If you’re assigning styles to scenes, you need to make sure the style saves the correct section plane visibility.
Confused yet?
The point I’m trying to make is that section plane visibility is ultimately controlled by a style setting. If you’re not aware of that when saving scenes, you’ll have unexpected results when reviewing your scenes.
Note: I downloaded this kitchen model from the premium model library formfonts.com. If you’d like to learn more about Form Fonts, check out http://www.mastersketchup.com/formfonts
When it comes to section cuts, there are three settings you need to know about:
- Section Planes (Style property)- These are the objects you see in SketchUp that control individual section cuts and indicate where section cuts are. They are important to see while working with section cuts, but can be distracting when seen in a final presentation or while modeling.
- Section Cuts (Style Property)- Section cuts are the actual cut through your model. Anything in front of the active section plane is visible, anything behind the plane is invisible.
- Active Section Planes – A section plane can be active, or inactive. When it is inactive, the section plane will have no affect on the model. When a section plane is active, and section cuts are enabled in the Style property, the section plane will slice through the model.
 You can toggle both of these visibility settings on the fly from the toolbar, which is great while modeling. But when you’re saving a scene with an active section cut, you’ll likely want to make sure you save the scene with a style that hides section planes.
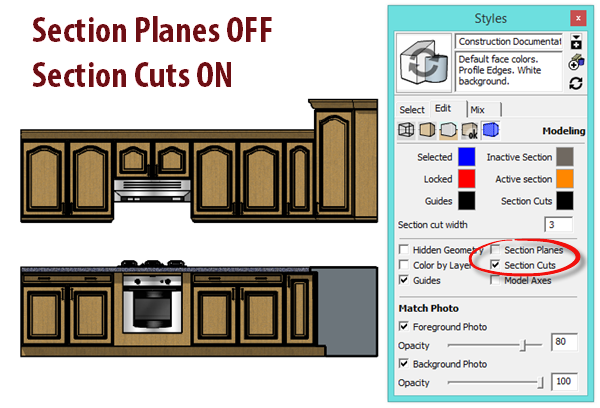
In almost all scenes where you have visible section cuts, you want to make sure section planes are OFF, and section cuts are ON.
In the image below, you’ll see a style with Section Planes active (BAD). Not only do you see the yellow section plane around the model, but there will be a light grey fill overlaid on top of the model too. You’ll also see any other section planes in your model, even if they are not active.
By making sure the style has Section planes turned off, and Section Cuts turned on (GOOD), you’ll be able to see the section cut of active section planes, but the ugly section plane objects will be hidden.
Tips for working with Section Cuts
- All of the styles in the “Default” folder have section planes turned off. These are good style choices for saving section cuts with scenes. If you use a different style, you might need to go into the Edit tab and manually change the style properties.
- When saving a scene with a section cut, make sure you have “Active Section Planes” and “Style and Fog” saved. (When in doubt, make sure all scene properties are checked. 99% of the time I have all of them checked.)
- You can have multiple section cuts active at the same time, as long as they are in separate groups/components. Only one section plane can be active per context.
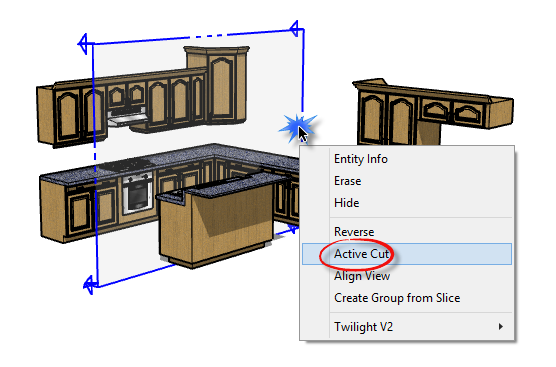
- To make a section cut active, right click on the section plane object, and select Active Cut.
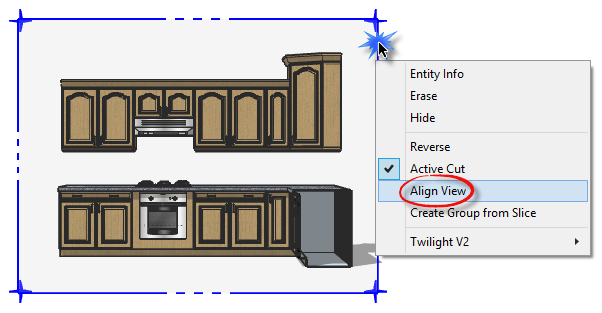
- You can align your camera to a section cut really easily. Right-click on a section plane, and select Align View.
- Once you save a style to a scene, you don’t need to worry about any style properties you override manually as you model. As long as the style you have assigned to the scene has the properties you want, you’re all set.
Aligned parallel view
The most common use for section cuts when creating construction documents is to create a parallel perspective view of your model with a section cut active. The key to getting the scene set up comes down to these steps:
- Activate the section cut. – You need to make sure the section cut you want is active. Right-click on the section plane and select Active Cut.
![activecut]()
- Align view to section cut – If you want the camera perspective to be aligned with the section cut plane, right-click on the section plane object and click Align View.
![alignview]()
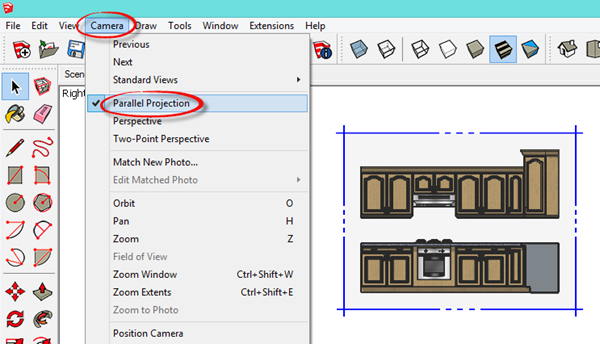
- Set camera to Parallel Perspective – To create a parallel line view, you need to set the camera. Go to Camera -> Parallel Projection.
![parallel]()
- Choose a style that hides section plane objects – In most cases, you don’t want the section plane visible in the finished scene, so you’ll want to have their visibility turned off. Since section plane visibility is a style setting, you need to make sure you activate a style that has the section plane visibility turned off. Check out my article on common SketchUp style misconceptions. Remember, whenever you insert a new section cut, section planes are toggled on automatically. But as long as the scene is assigned a style with hidden section planes, you’re all set.
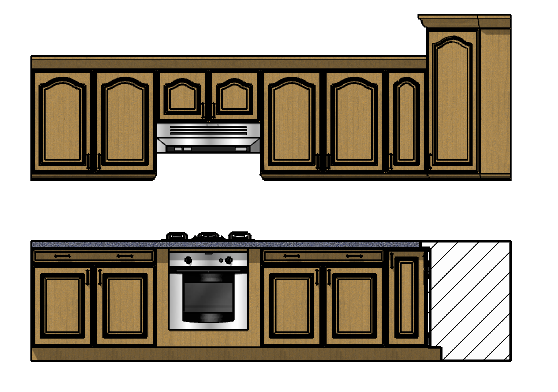
- Change the model cut surface or leave as is – When a section cut is applied to your model, you expose the inside surfaces of your model (because SketchUp is a surface modeler, not a solid modeler). This tends to look pretty terrible, so there are a number of techniques for applying hatches to your section cuts. Or, you can use a plugin such as Skalp (affiliate link) to automate the creation of hatching for your section cuts.
![kitchen]()
The post Saving Section cuts to scenes in SketchUp appeared first on www.MasterSketchup.com.