SketchUp Styles are what affect the visual appearance and representation of your models. In this article, I’ll address some of the most common misconceptions with how styles work.
But have you ever had the refresh symbol appear over the thumbnail in the Styles window? Or, have you ever gone to save a scene, and had a pop up appear asking if you want to save changes to your style? You probably got sick of it and checked off the “Do not show me this again” checkbox.
Until you understand some fundamental characteristics of how styles work, you’ll swear that they change settings randomly, don’t save changes after you’ve updated them, and don’t stick to your scenes when you save them. I want to clear up some of the confusion around how styles work.
Watch the video tutorial below, then continue on to the written tutorial.
Styles are copied to the current SketchUp model file.
When you browse through the Style window, you are looking at a list of styles that are saved on your computer, whether they are the default SketchUp styles, or ones you’ve customized or downloaded.
As soon as you click on a style, a copy of that style is saved within the model and the style is applied. It doesn’t matter if you click on the style just for a second, then go to a different one. A copy is made, and when you save your model, you’re saving the copy of that style with it. (There is an exception to this rule, see below)
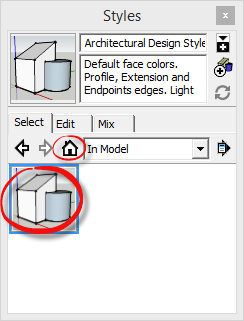
In fact, you can see all of the In Model styles by clicking on the icon that looks like a house (That’s the In Model folder shortcut) in the Styles window. Every style you have ever clicked while this model was open will appear in this list, even if the styles aren’t being used in a scene.

You can delete old, unused styles from your model.
If you click the Details button, and select Purge Unused, all of the unused styles will be deleted from your model. If you don’t have any scenes in your model that save style, you’ll be left with only one style; the last style you’ve applied to your model.

You’re editing your style and you don’t even know it
There are sooooo many style properties, and soooooo much flexibility in how you’re allowed to change style properties, that you’re likely changing your style without even realizing it.
- If you turn on XRay mode, you’ve just changed your style.
- If you hide section plane objects or section cuts, you’ve just changed your style.
- If you turn on Hidden Geometry, you’ve just changed your style.
- If you turn off textures, you’ve just changed your style.
- If you turn on Edge Profiles, you’ve just changed your style.
You can explore all the different properties that are controlled by styles in the Edit tab inside the Styles window. But, clicking any of the buttons below, or any of the menu items, you’re also affecting the properties of the current style.

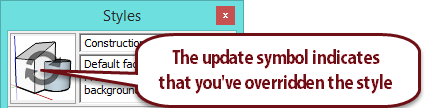
How do you know if you’ve overridden a style?
As soon as you change any of these things, you’re overriding the defined properties of the last style you’ve applied to your model. You can tell that you’ve overridden a style, because the thumbnail in the Styles window will show an “update icon”. And that’s totally fine!
Saving Styles in Scenes
The only thing that can be a problem is when saving scenes. Scenes save “In Model” styles. So, in order to have any overridden style properties attached to a scene, you need to either update your current style with those changes, or save the changes as a new style.
Does that sound familiar? Well that’s because that’s exactly what that dialog box is telling you to do when you save a scene. SketchUp detects that you’ve changed one or more style properties, and you need to tell it what you want to do with those changes.

- Save as a new style – You understand that you’ve overridden some of the style properties, and you want to save those changes under a new name so you don’t affect the properties of the last style you applied to your model.
- Update the selected style – You’ve overridden some of the style properties, and you want to update the last applied style to reflect those changes.
- Do nothing to save changes – If you do this, you will lose any modifications that you’ve made to style, and the scene will be saved with the last style you applied to the model.
Before you decide what you want to do, think long and hard about whether you already have scenes in your model that are referencing this same style. If you update this style now, then all your other scenes in your model that are referencing the same style will also be affected. When in doubt, choose Save as a new style.
Saving Styles for next time
So you’ve spent a bunch of time customizing some styles, and you KNOW you clicked the update icon in order to save it. But no matter what you do, it always reverts back to the default style properties when you try to apply it to your models.
If you’ve read this far, you should already understand why this happens… But let’s review this again.
Remember, whenever you click on a style, it creates a COPY of it and puts it in the In Model folder. This copy of the style saves with the model, and travels with it wherever it goes. So you’re not actually overriding the default styles saved on your computer when you make changes and update, you’re only affecting the copies of those styles that are attached to your model. If you’re still not following me, follow these steps and it will click:
- Open a new model, and open the Styles Window. Click the In Model button to see that there is one style in your model.
![inmodelonestyle]()
- Select Assorted Styles from the dropdown menu, and click on the Blueprint style. Your In Model folder will now show two styles; the original one, and now, the blueprint style.
![]()
- Make a change to a style property. Go to View -> Axes, to toggle axes. Notice that the thumbnail shows the update icon to tell you that you’ve overridden the style. Click Update to save the changes.
![blueprint update]()
- Click on the Blueprint style in the Assorted Styles folder again. You’ll notice your changes have disappeared, and it has reverted back to the original blueprint settings. This is because you’ve actually created another copy of the original blueprint style and saved it in your model. You’ll notice the name of the style is now Blueprint1 (since blueprint was already taken), and if you go to the In Model folder, you’ll see two copies of the Blueprint style.
![blueprintcopy]()


The most important thing to remember, is whenever you click on a style in any of the style folders, you create a duplicate and it is placed in the In Model folder. Any changes you make to it only exist within that model.
There is an exception to the rule. When you click on a style that you’ve previously applied to your model, SketchUp will automatically check to see if you already have a style in the “In Model” folder with the same name. It then compares all the style settings. If they are identical, SketchUp won’t place a duplicate copy in your model. In other words, if you click the “Architectural Style” fifty times, you won’t see fifty copies in your In Model folder, you’ll only see one.
To learn how to save styles for future use, check out my article on migrating settings to a new version of SketchUp. You could also save your model as a template, and all the In Model Styles would be available to any projects you start with that template.
The post Common SketchUp Styles Misconceptions appeared first on www.MasterSketchup.com.