LayOut’s Dimension tool allows you to easily add dimensions to your model. Here are eight tips to help you become even more efficient at adding dimensions to your LayOut documents.
LayOut Dimension Tool Basics
In its simplest form, the Dimension tool is used to measure the distance between two points on a page by doing the following:
- Activate the Linear Dimension tool.
- Click on the first point you’d like to measure.
- Click on the second point you’d like to measure.
- Drag your mouse out to where you want to place the dimension line, and click to set position.
That is the basic way to insert a dimension in LayOut, but there are some other things you should be aware of. Style, leaders, and alignment are all important if you want to create accurate and clear dimensions. LayOut also has some built in shortcuts to increase your speed while inserting dimensions.
-
Multiple aligned dimensions
When placing dimensions, you’re likely to come across a situation where multiple dimensions need to be placed along the same linear path. For instance, you might have a floor plan, and you’re dimensioning the distances between each window. You want each dimension line offset to be aligned perfectly with each other. LayOut offers a quick way to insert these types of dimensions.
If you think you already know the “double-click” trick, take a second look. There are actually TWO DIFFERENT double click shortcuts offered by LayOut. Make sure you know the differences between the two.
![Double Click Dimensions]()
The first step is to create your first dimension. This will establish the offset and alignment for each additional dimension. Then, to add additional dimensions, just double click on the END POINT of your new dimension. That’s it! LayOut will use the end point of your previous dimension as the starting point for the new one. The offset height will match as well, producing dimensions that are perfectly aligned to each other.
-
Match dimension offset
The previous trick is great when you have a number of dimensions aligned along the same path. But what if you need a way to “remember the offset distance”, regardless if the dimension is aligned to other dimensions or not? LayOut provides a shortcut to help you do that too.
Create your first dimension to define the offset distance. Then, for each additional dimension, click once at your starting point, then double click at the second anchor point to place the dimension line at the same offset as the previous dimension you inserted.
![LayOut Dimension Offset]()
One problem you may encounter with this trick, is the dimension line sometimes offsets in the wrong direction. It’s not really “wrong”, you just need to understand how it works first. For instance, if you click from left, to right, the dimension will offset “under” the points. If you click from right, to left, the dimension will offset “above” the points.
![Double Click offset]() In other words, it all depends upon which point you click first. It’s what I like to call “Counterclock-wise perpendicular”. Imagine that once you place your first point, the leader will swing around, counterclockwise, 90° to your second point that you double click.
In other words, it all depends upon which point you click first. It’s what I like to call “Counterclock-wise perpendicular”. Imagine that once you place your first point, the leader will swing around, counterclockwise, 90° to your second point that you double click. -
Same layer for easy styling
When you’re placing dimensions in your document, it’s worth making sure they’re all on the same layer. Not only does this allow you to stay organized and toggle the visibility of your dimensions, but it’s handy if you want to change the style of all your dimensions at once.
![Add Layer]() To create a layer for the dimensions, open the Layers panel. Click on the Plus sign to add a new layer, and type in a name for that layer, (Something like “dimensions” will do just fine.)
To create a layer for the dimensions, open the Layers panel. Click on the Plus sign to add a new layer, and type in a name for that layer, (Something like “dimensions” will do just fine.) Then, before you start inserting dimensions, just click on that layer in the Layers panel to make it the current drawing layer. (You’ll know which layer is the current drawing layer by the red pencil icon next to it.) Everything you add to your document from that point forward will be added to the active layer.
![LayOut select entities on layer]() Let’s say, for instance, you wanted to change the text style of all the dimensions after you’ve inserted all of them. You can just go to the Layers panel, right-click on the “dimensions” layer, and click on “Select Entities”, and that will select all the objects on that layer, (all your dimensions).
Let’s say, for instance, you wanted to change the text style of all the dimensions after you’ve inserted all of them. You can just go to the Layers panel, right-click on the “dimensions” layer, and click on “Select Entities”, and that will select all the objects on that layer, (all your dimensions). With the dimensions easily selected, you can then go to the Text panel, and change the font however you’d like. You can change other style properties of dimensions in the Text panel, Shape Style panel, and the Dimensions panel.
-
Edit anchor points
You’ve probably noticed by now that anything you can select in SketchUp can be scaled by dragging one of the arrows around the selection box. Dimensions are the same way. But DON’T DO IT! There’s a better way!
If you find yourself needing to edit the placement of any of the dimension anchor points, (There are a few of them, each affecting a different part of the dimension), you need to double click the dimension with the select tool, to open it for editing.
![LayOut Dimension anchor points]()
Once a dimension is opened for editing, you’ll see various blue dots over the anchor points in the dimension. You can change the dimension offset, the length of the leaders, and even the points at which the dimension is measuring.Don’t forget about the inference system. You can reference other points on the page to help you align the anchor points to other objects in your document. (Assuming you have Object Snap or Grid Snap enabled).
-
Pick points don’t need to be parallel
![Non parallel pick points]() LayOut will allow you to align dimensions either horizontally, vertically, or perpendicular to the two pick points (You can also hold ALT to unlock alignment). What that means is you don’t have to pick two points that are parallel to the dimension line you want to create.
LayOut will allow you to align dimensions either horizontally, vertically, or perpendicular to the two pick points (You can also hold ALT to unlock alignment). What that means is you don’t have to pick two points that are parallel to the dimension line you want to create. The advantage of doing this is you can pick points that allow the leader legs to be offset from the model. Otherwise, you’re likely to run into a situation where one of the leaders overlap the viewport, and you need to double click the dimension to edit the leader leg length.
-
Changing the default Leader length
You might already know how to change the default style of the Dimension tool. Select the Dimension tool, set the properties you want to change, THEN draw the dimension. This goes for any tool in LayOut; activate the tool, change the settings, then use the tool.
You can also set style by using the Eyedropper tool. Click the eyedropper, sample from the object you’d like to borrow the style from, then click the tool you’d like to apply the style to. From there, use the tool to create your object and you’re all set.
But the Dimension tool also allows you to change the default leader leg offset too, by using the Eyedropper tool. This is very useful when you have to place multiple rows of dimensions, placed at different offsets from each other, or if you simply want a different offset than the default one.
![LayOut dimension leader legs]()
First, create a dimension, double click it and adjust the length of the leaders. Next, activate the Eyedropper tool and click on the dimension to sample it. Finally, click on the Dimension tool to apply the sampled style and leader offset to it.Now, when you insert dimensions, The leader length will be the same as the one you sampled from.
-
Saving dimension styles
Use Scrapbooks to save different dimension styles which you can sample from in any of your projects. (Short tip, but really, scrapbooks are useful!)
-
Dimension perspective viewports
![LayOut Dimension perspective]() You’re not limited to adding dimensions to Ortho viewports. If you have a viewport set in perspective mode, you can still snap dimensions to it, and LayOut will automatically read the distance between the two points you picked in the viewport.
You’re not limited to adding dimensions to Ortho viewports. If you have a viewport set in perspective mode, you can still snap dimensions to it, and LayOut will automatically read the distance between the two points you picked in the viewport. You just need to make sure Object snap is enabled, and that your pick points are snapped to points in your model. You can unlock the dimension alignment by holding the ALT key.
 In other words, it all depends upon which point you click first. It’s what I like to call “Counterclock-wise perpendicular”. Imagine that once you place your first point, the leader will swing around, counterclockwise, 90° to your second point that you double click.
 To create a layer for the dimensions, open the Layers panel. Click on the Plus sign to add a new layer, and type in a name for that layer, (Something like “dimensions” will do just fine.)
  Let’s say, for instance, you wanted to change the text style of all the dimensions after you’ve inserted all of them. You can just go to the Layers panel, right-click on the “dimensions” layer, and click on “Select Entities”, and that will select all the objects on that layer, (all your dimensions).
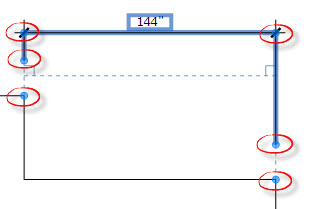
 LayOut will allow you to align dimensions either horizontally, vertically, or perpendicular to the two pick points (You can also hold ALT to unlock alignment). What that means is you don’t have to pick two points that are parallel to the dimension line you want to create.
 You’re not limited to adding dimensions to Ortho viewports. If you have a viewport set in perspective mode, you can still snap dimensions to it, and LayOut will automatically read the distance between the two points you picked in the viewport.
 (You can also insert angular dimensions, but that’s for another article…)
The post 8 tips for creating dimensions in LayOut appeared first on www.MasterSketchup.com.