While I’m a big advocate for taking the time to set up scenes in SketchUp ahead of time for the viewports you’d like to create in LayOut, there are actually many tools built right into LayOut that let you insert and orient viewports on the fly. In this article, we’ll go over how to create a basic LayOut document without any preparation in SketchUp.
But what if you’re looking to create a few simple perspectives of your model in LayOut to get it out the door quickly? There are many tools built into LayOut that allow you to insert any SketchUp model and control the perspective and style without any preparations ahead of time. Watch the video below, or continue on for the written tutorial.
Inserting a model into LayOut
 In this tutorial, I’m going to use a model I found on Formfonts. Formfonts is a premium model library full of high quality models that are professionally made to reduce file size while maintaining a high visual standard. If you’re in need of professional models to add detail to your own models, I highly recommend you check out their membership. Click here.
You could go straight to LayOut with your model, but it’s worth noting a few things to save you from frustration down the road:
- If you have a lot of guides (from the Tape Measure tool) you’ll probably want to delete them so they don’t end up in your viewports. Go to Edit -> Delete Guides to delete all guides in your model. (If you’re editing a group/component while you do this, it will only delete the guides in that group/component.)
- If you DO have section cuts in your model that you don’t want showing up in your viewports, you need to make sure you have a custom style created that hides section cuts or section planes.
- If there are certain objects in your model that you don’t want displayed in any viewports, you must hide them. Either assign them to a hidden layer (Go to Window -> Entity Info -> Select the layer you want to assign it to. Then go to Window -> Layers, and uncheck that layer visibility.) Or, hide the objects by right clicking them and selecting Hide. (You can unhide them from the Outliner Window)
Once you’ve finalized your model, make sure you save it. Then, go to File -> Send to LayOut. (You need SketchUp Pro in order to get LayOut.)
Creating a LayOut Document
When you click Send to LayOut, LayOut will then open and ask you to choose a template to start from. The template will define the size of the page (common paper sizes are used in the included templates, but you can create or customize your own) as well as any titleblock elements that display on the page.
- Select the Simple Serif folder located in New -> Default
Templates -> Titleblock -> Simple Serif. - Select the Letter Landscape template.
- Click Open.
![LayOut choose template]()

LayOut will then generate a new file using the template you chose, and insert a viewport of your model showing you the last saved view from SketchUp. (By the way, you don’t HAVE TO use the “Send to LayOut” command inside SketchUp. You can open up a new LayOut document directly from inside LayOut, then go to File -> Insert to insert your SketchUp model.)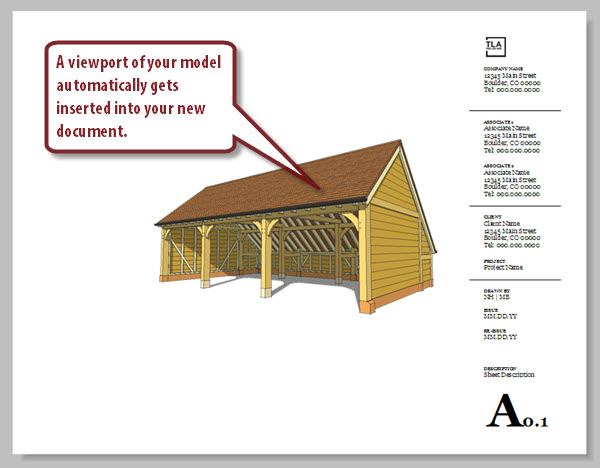
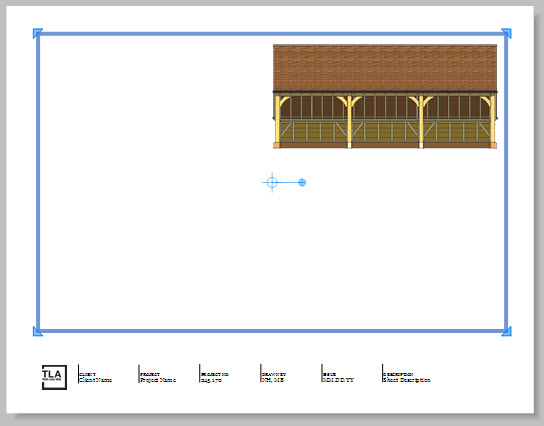
It’s worth noting that this particular template happens to include two pages, titled “Cover page” and “Inside page”, and the document opens up on page 2 by default. So just be aware that the viewport is inserted on page 2.
You can check out all the pages in your document, by opening the Pages panel on the right hand side of your workspace. (Just click on the title bar of the panel, where it says “Pages”.) For future reference, you can add, delete, duplicate, or rename pages from this panel.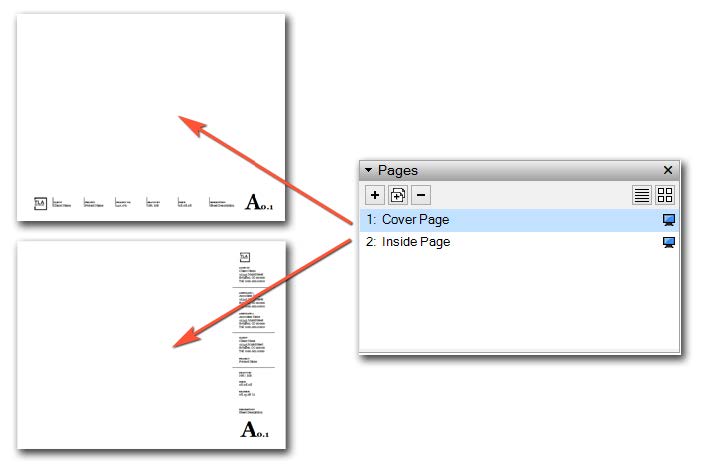
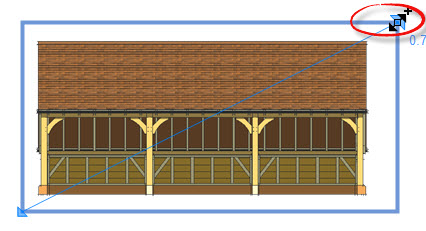
Orienting a Viewport without Scenes
Let’s go ahead and change the look of our viewport so it gives us a front view of the building in Orthographic perspective. Typically, if this were a model in which I had saved scenes from inside SketchUp, I would click the SketchUp Model panel, and select the appropriate scene from the dropdown menu, set the scale, and be done.
But since we didn’t save any scenes in this model, we’re going to use the built-in tools in LayOut to set the viewport.
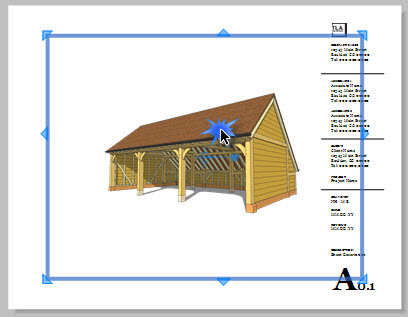
- With the Select tool, click on any part of your model in the viewport. You should see a blue bounding box appear around the viewport, indicating that it is selected.
![select viewport]()
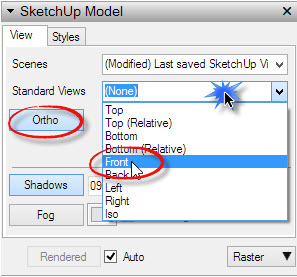
- Expand the SketchUp Model panel by clicking in the title bar. In the View tab, Click the Standard View dropdown menu and select Front.
- Click the Ortho Button to turn on Orthographic perspective. (The button should be blue.)
![Set viewport]()
- Set a standard drawing scale for the viewport. Click the scale dropdown menu and pick a scale that fits the page well for the size of your model.
![LayOut scale]()
- Now that you’ve got the camera perspective set, and the zoom scale set, you can now resize the border of the viewport to fit the model. One important thing to note is you want to Preserve scale on Resize. If you don’t have this checked, the scale of the model will change as you resize the viewport boundaries. (This box will automatically be checked when you set a standard scale.)
![Preserve Scale of Resize]()
- Now you can resize the viewport boundaries. With the viewport still selected, hover over one of the edges of the blue boundary box. When your cursor changes to an arrow, click and drag the box to resize it tightly around the model. (You can also drag from a corner as well. )
![resize viewport]()
- Finally, we need to move the viewport into its final position on the page. If you hover over a viewport with the Select tool, you’ll notice that the cursor changes to a Move tool. Click and drag to move a viewport to another position on the page. (Be careful not to double click a viewport unintentionally. This will put you into Model Space. Press ESC if you find you’ve entered model space by accident.)
![Reposition Viewport]()


Copying Viewports
Once you’ve created one viewport of your model, making additional viewports is very easy. You can make a copy of an existing viewport by clicking and dragging it while holding down the CTRL key on your keyboard. (Holding down SHIFT as well will lock alignment during the copy.)
Once you’ve created your copy, just go back to the SketchUp Model Panel with your new viewport selected. (The SketchUp Model panel will always affect the currently selected viewport.) Change the standard view from the dropdown menu as needed to create the perspective you want.
You can also copy and paste viewports between pages by selecting the viewport you’d like to copy and pressing CTRL + C. Then, navigate to the page you’d like to place it on from the Pages panel, activate the layer you want the viewport to reside on from the Layers panel, and press CTRL + V to paste.
Custom perspectives with Model Space
Aside from using the preset perspectives in the SketchUp Model panel, you can also orient your own perspective view of your model by entering Model Space. Model Space enables familiar tools such as Orbit, Zoom and Pan so you can reorient the camera to a custom perspective.
- Copy a viewport, navigate to the Cover page from the Pages Panel, then paste it.
- Resize the viewport so it takes up the entire page.
![Resize full page]()
- Turn off Ortho, by clicking the Ortho button in the SketchUp Model panel.
- To enter Model Space, double click on the viewport. You should notice the cursor change to the orbit tool. Click and drag to orbit the camera around the model. Hold the SHIFT key to pan. Use the scroll wheel to zoom in and out.
- Click anywhere outside of the viewport to close Model Space (Or, just tap ESC).
![model space]()

Additional Viewport controls inside LayOut
In addition to being able to set the camera perspective with either a standard view or a custom view in model space, there are other properties you have control over from inside LayOut.
- Shadows/Fog - You can toggle Shadows and fog, and control the time of day shadows are projected from. (For full control, you must do this inside SketchUp.)
- Styles - In the SketchUp Model panel, there is a second tab labeled Styles in which you can assign a style to the model viewport. (You must edit Styles inside SketchUp.)
- Line Weight - Also in the Styles tab, you’ll see a box where you can input a line weight size. This will affect the line weight of edges in the entire viewport,
- Background - This toggles whether the background from your model appears in the viewport or not. If it is unchecked, any objects underneath your viewport will be visible behind your model.
- Render Mode - Viewports can be rendered as raster, vector, or hybrid.
Advanced models need Scenes
For anything other than simple exterior perspectives of your entire model, you need to prepare scenes ahead of time in SketchUp for LayOut. There are many different situations that call for careful preparation of scenes:
- Section Cuts - If you have any section cuts of your model, you need to save scenes so you can control when the section cuts are active, and so you can align the camera to them.
- Phases/Alternate designs – When you have different iterations of your model organized under different layers, you need to save scenes in order to control the visibility of the various layers in each viewport.
- Visible depth – You may need to use special geometry or visual tricks in order to have control over the visible depth of your model.
- Extracting sub-assemblies of your model - Highlighting certain sub-assemblies of your model requires that you control visibility of objects in your model and save those properties in scenes.
- Composite viewports (stacking viewports on top of each other) – Stacking viewports opens up an entirely new set of possibilities for creating composite viewports.
- Multiple styles applied to the same model - Another effect achievable by stacking viewports, scenes are required to save the configurations.
If you have projects that require you to create scenes for LayOut, my ebook, SketchUp to LayOut, will walk you through everything you need to know about creating scenes in SketchUp so that you have complete control over your model in LayOut. 
It can also be considered a full manual for using LayOut. It covers all the basics of LayOut in addition to a number of advanced techniques for creating viewports and setting up your model to create complete construction documents using only SketchUp and LayOut.
I’ve also published a complete video course with over 3 hours of training that you can view on your computer, tablet, or smart phone. You can find the video course (Which includes the ebook) at www.sketchuptolayout.com as well.
If you have any questions, feel free to leave a comment below!
The post Quick Document Creation in LayOut appeared first on www.MasterSketchup.com.