Do you feel like you’ve missed out on the SketchUp 3D Basecamp 2014? I’ve just returned from teaching my first live class at Basecamp, and in this article you’ll learn some of the tips I’ve picked up from the best SketchUp gurus in the world.
During the opening presentation by John Bacus, SketchUp Product Manager, we learned about the new SketchUp model viewer for the ipad, available here, a new Ruby Debugger plugin, and an extension that can process 3D point cloud data from Trimble 3D scanners.
The conference is made up of a number of presentations and instructional sessions, including some hands-on classes as well. I had the honor of being asked to teach an “Introduction to LayOut” 3-hour class, based on my book, SketchUp to LayOut. It was the first time I had taught live, in person, to a large audience. I was nervous at first, but once I started, everything just fell into place.

We started with a blank LayOut document, and we went through the process of inserting SketchUp model viewports, adding dimensions and annotations, and learning how to stay organized. I was afraid that I was going to have a hard time keeping pace with the different skill levels of the audience, but everyone seemed to follow along very well.

My class was one of the first sessions at Basecamp, so I was able to attend many of the other sessions. I’d like to share with you some of the tips I’ve learned from people who have been using SketchUp in some really incredible ways.
Consider this the 3D Basecamp afterparty ![]() Click to Tweet if you agree!
Click to Tweet if you agree!
Artistic Architectural Rendering with Photoshop & SketchUp
Jeremy Kay – www.studiojdk.com
Jeremy is a very talented architectural rendering artist, and he shared many of his techniques in a hands-on workshop I attended. I had a chance to interview Jeremy last year on my podcast. Check it out at http://www.mastersketchup.com/jeremykay/

You can read a step by step tutorial on how he created this beautiful render at http://www.ronenbekerman.com/making-of-urban-plaza/
Tips from Jeremy
- Export multiple images from SketchUp of the same perspective, but with different styles and objects shown. Place these images into Photoshop on different layers, and adjust the blending mode and opacity of each layer to create a unique look and feel.
- Create one utility image export from SketchUp by painting the various elements in your model with bold, contrasting colors. In Photoshop, use this layer with the Color Select tool to create a selection around all similar objects or textures.
- Hue and saturation are great for tweaking colors. Objects in the distance tend to be more blue and less saturated. Apply this to your render to make it appear more convincing.
Materials & Textures for Interior Design
Diane Dieterich – www.seeddd.com
SketchUp is a preferred tool among interior designers, and Diane did a great job of demonstrating why. Materials and textures are a key component to communicating the visual impact of color and fabric choices in an interior design. Diane taught us some advanced tips and tricks when working with materials in SketchUp.
This video teaches a lot of the tricks she taught in her class at Basecamp.
Tips from Diane
- Build your own library of materials over time that you can reuse in future projects. Save them to a folder that is synced to a cloud service such as Dropbox, or Google Drive. This way, your materials will be available to you on any computer you use, wherever you are.
- You can find materials through Google image search using terms like “tileable”, or “seamless”. Some other sources for materials can be found at www.cgtextures.com, or use a professional resource such as FormFonts (Affiliate link).
- When searching for images to use as materials, don’t worry too much about the color of the material. Instead, focus on finding a pattern you like, then use the built in editing tools in SketchUp to adjust the hue and saturation of the material.
SketchUp Workflow for Architecture
Mike Brightman www.suexch.com
Mike has proven that the key to creating documents in LayOut is staying organized in SketchUp. While he is the first to admit that staying organized can be overwhelming, he has provided a solution to that as well with a new plugin that automates much of the process (The plugin will be launched soon).
Here is a playlist of videos giving you an overview of his workflow. These tips are explained in more detail in his book, “The SketchUp Workflow for Architecture“.
Tips from Mike
- You can create “utility scenes” to control specific SketchUp properties or objects. For example, you can create a scene that saves the axes orientation at 45°, and one that saves it at 90°, to make it easy to orient the inference system. You can also create scenes for different layer visibility states. You could create a scene that only shows the interior of a building, by hiding all the layers that have to do with the exterior. Just remember that you have control over which properties are saved in scenes.
- Drawing hatches and patterns in LayOut creates redundant work that’s not necessary. Mike uses a special set of styles that overlay a hatch pattern onto your model in SketchUp. You can learn more about this method in my article www.mastersketchup.com/layout-pattern-fill-hatching/
Creating Clearer Drawings in LayOut – Nick Sonder
Nick has pioneered an entirely new way to create construction documents using SketchUp and LayOut. He ditched AutoCAD long ago to use SketchUp and LayOut exclusively to design and document custom homes.
Check out this video to see the results he attains using SketchUp & LayOut. If you haven’t seen this video yet, this is a MUST WATCH!
Here is a playlist of videos walking through his process:
- When creating floor plans, use two viewports stacked on top of one another in LayOut. The first viewport should be a raster image of your model in your preferred style and shadows. The second viewport should be created from a section plane through your walls, using the “create group from slice” command. (I really like using a plugin, SectionCutFace, for this method. Buy my book for step by step instructions) Copy and paste that linework into LayOut on top of the first viewport and render it as vector to have nice, sharp lines.
- Create separate models for typical construction details such as wall assemblies, window flashing details, framing details, etc. This allows you to use simple shapes to represent walls in your main model, while still being able to communicate fine details in your LayOut document.
SketchUp tips for Woodworking – Dave Richards
Dave Richards – Design, Click, Build
If you read Fine Woodworking, you’ve probably come across some of Dave’s work. He creates illustrations for the magazine using models he’s created in SketchUp. Dave demonstrated some clever ways of creating woodworking models in SketchUp.
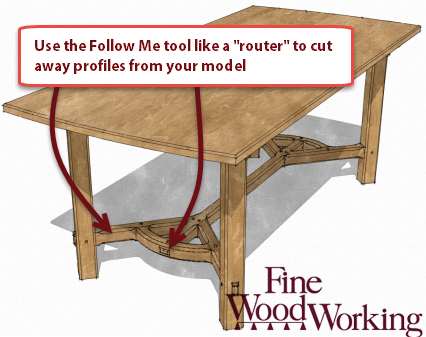
- The Follow Me tool can be used much like you would use a router on wood. Create a path that you’d like to cut on, design your cutting profile, then use the Follow Me tool to extrude the profile along the path. If needed, use “intersect with faces” or the Solid tools to delete geometry.
- Sometimes, when using the Follow Me tool, small faces will end up missing due to the operation. A workaround for this is to use components and scale one of them up by 1000%, perform the Follow Me, then delete the copy. See entire tutorial on Design, Click, Build
- Dave loves to use keyboard shortcuts. I feel the same way. It turns out we both created custom keyboard shortcuts for the Edit -> Paste in Place command, which is really handy for moving objects in and out of groups/components without changing it’s physical location.
Presentations I wish I had attended
Basecamp gives you a ton of options to attend different sessions that pique your interest. Unfortunately, there are multiple sessions scheduled for the same time slot. So when you go to one, you end up missing three others. Here are some sessions I had missed, but wished I was able to attend:
- Alexander Schreyer – Author of Architectural Design with SketchUp, Alex taught some classes on components, ruby programming in SketchUp, as well as plugins. You can catch my interview with Alex at www.mastersketchup.com/msp-002-interview-with-alexander-schreyer/
- Eric Schimelpfenig – Plugin author of the powerful Kitchen plugin SketchThis (Affiliate Link), Eric used his experience with dynamic components to teach a hands on class to help students leverage the power of automated dynamic components. You can catch my interview with him from the 2012 Basecamp.
- Skalp – This is a new plugin that is coming out soon. It’s a sort of “dynamic” Section Plane tool. I’m really excited about this one, it will make hatching so much easier and much more powerful. Check out www.skalp4sketchup.com
- PlusSpec – This plugin is going to be a game changer for people using SketchUp to design buildings in SketchUp. Using a similar workflow to programs such as Envisioneer, SoftPlan, or Chief Architect, PlusSpec introduces a simple way to insert common building objcts such as walls, floors, roofs, windows, doors, etc. At the end of the design process, the entire bill of materials can be exported along with pricing and product information.