In this tutorial, I’m going to show you how to set up your SketchUp model so you can reference existing floor plans and elevations for reference. You’ll learn how to use layers and scenes to organize your model to help you reference your imported files throughout the modeling process.
I thought it would a fun project to see if I could slice the image and import them into SketchUp to try to model it. The house is a very exaggerated structure that has been extended with many additions that look like they may fall off the house at any minute. I knew it would be challenging to model with everything being off square, but I had a lot of fun building it.
Watch the video, or continue below
The Burrow
I came across the plans and elevations of the burrow at http://www.elizabethstewart.co.uk/blog-category/harry-potter-studio-tour-a-set-designers-dream/?hc_location=ufi. Once I sliced up the image, I took each floor plan and elevation and placed them in the SketchUp model to use as reference. You’ll notice that the floor plans are located at the actual height where they occur in the model. This makes it easy to confirm details while modeling. If you had section cut drawings that you’d like to import, you could do the same thing and locate them in the model where they occur.

The elevations are located at a distance away from the model. This gives you more visual space to compare between the drawing and the model while in perspective view, allowing you to keep the elevation layer visible while modeling.
Each image is assigned to a different layer, so that I can turn them on and off, depending upon what part of the model I’m working on.
Setting up a model like this involves a few steps:
- Importing the plans and elevations into SketchUp. (I prefer jpegs, but you could use DXF if you have them)
- Scaling the plans and elevations.
- Aligning the plans and elevations.
- Assigning each image to a layer so you can toggle visibility.
- (Optional) Set up scenes to quickly align camera and set layer visibility for each view.
The Burrow
by MSketcher
on Sketchfab
Importing plans and elevations
You might assume that the best type of file to import would be a CAD file, but in my experience that is not the case. The apparent advantage of importing a DXF into SketchUp is that the file is converted into SketchUp entities, saving you from having to reproduce them yourself. However, in my experience I find most CAD files to have broken edges, superfluous entities or layers, or are not 100% precise with their dimensions. This can cause a ton of headaches in SketchUp.
I prefer drawing my work from scratch, that way I know with certainty that all of my geometry is accurate. I’ve also tried to “trace over” imported CAD (by keeping the imported entities contained in their own group), but have found it challenging because SketchUp wants to snap to the imported entities, which aren’t always accurate.
So, this is why I prefer jpeg. It gives me a flat surface to draw on, no entities that mess up my inference system, and if the file isn’t scaled perfectly, it doesn’t matter because I’m typing in my own dimensions.
That said! If you have DXF files, definitely try importing them into SketchUp and see what they look like. Well executed CAD files imported into SketchUp can save you a ton of time, it’s just that I rarely see CAD files clean enough to import directly into SketchUp.
Importing JPEG images
In my case, I had a single image that I needed to slice up into separate images. Most likely, you’ll already have your plans and elevations as separate images. However if you need to split up an image, a really easy way to do this is to use the built-in snipping tool on Windows. If you’re on a Mac, just press command + SHIFT + 4 and that will let you grab a screen shot. (The image will save to your desktop)
To import the images into SketchUp, follow these steps:
- Create a new SketchUp file. It helps to orient the camera to top view, go to Camera -> Standard Views -> Top. Then, go to File -> Import.
![import]()
- In the drop-down menu, make sure to change the file format to “All supported Image types”. (Otherwise, your image won’t appear in the folder so you won’t be able to select it.)
![Import image types]()
- Find your image, and click Import. (Keep “Use as Image” selected for the import option.)
- Your image will now be attached to the end of your cursor. Double click at the origin of the axes to place the image in your model. Once you’ve placed the image, don’t change your camera perspective! It’s important because SketchUp’s default scale for image imports is relative to the current camera perspective. In order to import each image at the same scale, don’t Pan or Orbit the camera while importing images. (If your images are drawn at different drawing scales, this isn’t important because you’ll have to manually scale each image individually.)
![Place image]()


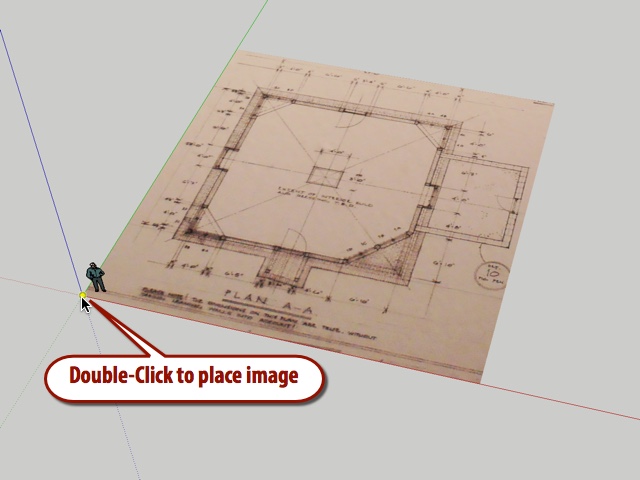
Repeat this for each image you want to import. I like to focus on all the plans at once, then I go back and do the elevations. By double-clicking, each image will be imported at the same scale. This can be advantageous to you if each drawing was drawn at the same scale because you’ll then be able to scale all of the images to “actual size” all in one move, instead of having to do each image individually.
Scaling the plans
Once all of your images are imported, you can use the Tape measure tool (T) to quickly scale them to full size. (In SketchUp, it’s usually best to model at real-world dimensions) If all of your images were drawn at the same drawing scale, and you were able to import them at the same scale, then you can scale your entire model all at once.
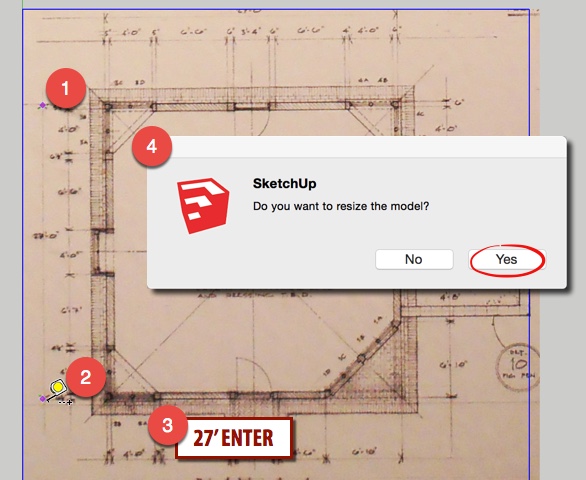
To scale all of your images at once, follow these steps:
- Activate the Tape Measure tool.
- Find a dimension line in one of the drawings that you can reference. (The longer the dimension line, the better, as it will give you a more accurate reading.)
- Click at one side of the dimension line.
- Click a second time at the other side of the dimension line.
- Type in the scaled dimension, and press ENTER.
- A popup window will ask if you want to scale your entire model, click yes.
![scale model]()
Scaling individually
You can scale images individually too, they just need to be within their own group or component. One way to do this is to right click on an image, select Explode, then right click on it again and select Make group.Aligning and Positioning Plans
Once your plans are all scaled to actual dimensions in SketchUp, you can start to align and position them. Right now, all the images are stacked on each other on the same plan. The first thing we want to do is separate them so we can work with them more easily.
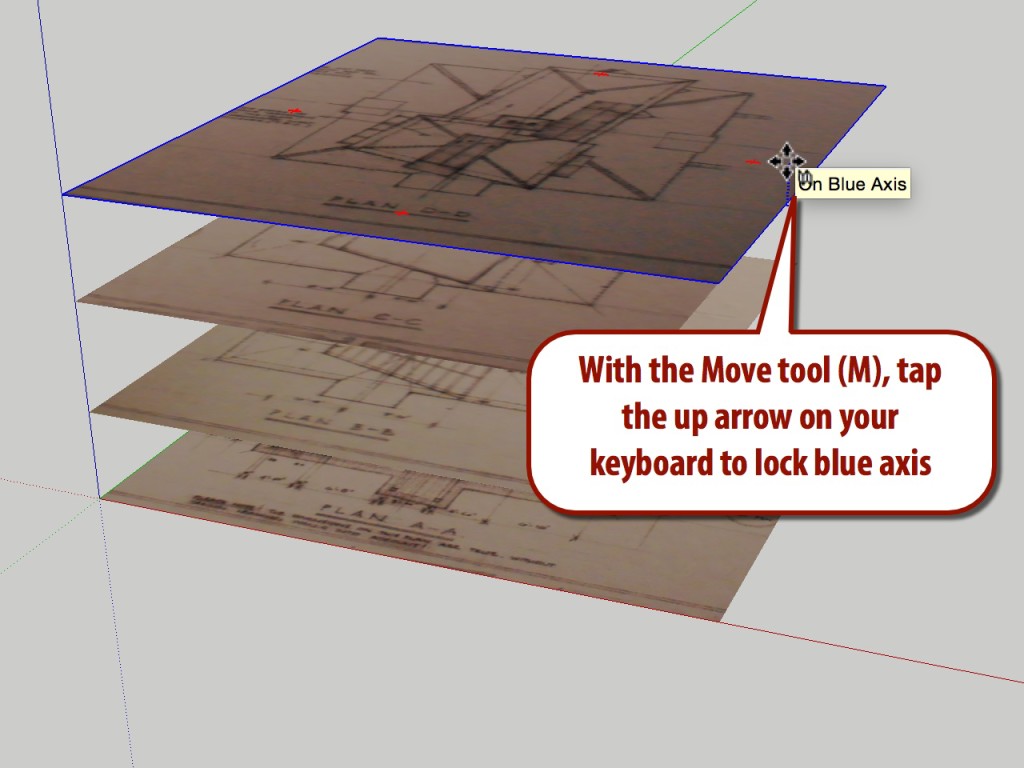
Orbit out of the Top view, to a more angled perspective of the plans. Using the Move tool (M), click on each image, (tap the up arrow on your keyboard to lock blue axis), and distribute the plans several feet away from each other. (It helps to position your mouse out over open space when moving along the blue axis, so SketchUp doesn’t reference any surfaces while moving)
Assigning plans to layers
I like to assign each plan to its own layer so that I’m able to have full control over which images are visible. If you didn’t want to bother with layers, you could just right click on images you want to hide and select Hide. But since images do not show up in the Outliner window unless you explode and regroup them, you won’t be able to Unhide them without going to View -> Hidden Geometry, then right clicking on them manually to Unhide.
Create a layer for each image in the layers window. Go to Window -> Layers to view the layers window. Click the Plus sign to add a layer, name it something descriptive, like 1st floor, 2nd floor, etc.
To assign an image to a layer, select it with the Select tool (Spacebar), then go to Window -> Entity Info, and select the layer you want to assign it to from the dropdown menu.

Aligning plans
Once you have each plan assigned to a layer, go ahead and turn off all but the first floor plan. (In the layers Window, Uncheck the box next to the layer you want to hide)
- Go to Camera -> Parallel Projection. Then, go to Camera -> Standard Views -> Top. This will set the camera to an aligned top view so you can align each floor plan. (You might want to save a scene at this perspective, as you’ll come back to it often.)
- In the Layers window, turn on another floor plan.
- You won’t be able to see the relationship between the two plans yet because we need to turn on Xray view. Go to View -> Face Style -> XRay.
- Using the Move tool (M), move the upper floor plan along one axis at a time (left arrow for green axis, right arrow for red), aligning it to the floor plan below. It’s very important to use the arrow keys during this step so you don’t change the height of the image accidentally.
![align]()

Repeat this process for each plan. Hide and unhide layers as needed and align each plan to the bottom floor plan. Use this process to confirm that each plan has been scaled properly too. You might have to make some small adjustments as you go along. When you’re done, you should be able to view your model from above with all the plans visible and clearly see that they are aligned.
Elevations
Go through the same process of importing images for each elevation. Before scaling them with the Tape Measure tool, make sure you select all of them and place them into their own group. (If you don’t do that, then your entire model will change scale, messing up your floor plans.) Instead, enter the group your elevations are contained within, and use the Tape Measure tool within the group. That will restrict the scaling to within the group, not the entire model.
Here are some other tips when working with the Elevations:
- To rotate each elevation, just activate the Move tool (M) and hover over the image until you see the rotate handles. Snap to 90º as you rotate.
- Sometimes it’s hard to move an object in three dimensions at once. Instead, focus on one axis at a time. Use the arrow keys on your keyboard while moving to restrict movement to one axis.
- Locate each elevation several feet away from the floor plan image, in order to give you some space to work. When in an aligned Parallel Projection mode, the distance doesn’t matter, so don’t be afraid to give plenty of space.
![elevationsaway]()
- Align the front and back elevations with each other, then align the left and right elevations with each other. You’ll then want to align each to the first floor plan.

Modeling
Once you have your floor plans and elevations set up, you can start modeling. I like to start with the floor plan, and go up from there. Hide all of the other images except for the first floor plan. Use the drawing tools to trace over the floor plan and build your model. Use the other images as reference throughout the process. Here are some tips on various perspectives you’ll find helpful:
- Draw on the surface of the elevation image, then move the object along axis onto your model. I did this for many of the window units on the house.
- Use Xray mode to see through the images and the plans. Add the Xray button to your toolbar for quick access.
- You can highlight multiple layers at the same time (hold CTRL or SHIFT) and toggle their visibility at once, instead of having to check each box individually.
The post SketchUp modeling from plans and elevations appeared first on www.MasterSketchup.com.