In 2015, LayOut’s label tool got a lot smarter. It unlocked an enormous amount of data from your model, allowing you to read classification data and dynamic component attributes. In this tutorial, I’ll show you how to use dynamic components to add text data to your model, then read it from within LayOut.
Even if you’ve never used dynamic components before, this will be a good introduction to how they work. If you’ve ever created an Excel spreadsheet formula, then you should be comfortable using dynamic components.
The “Smart” Label tool
The Label tool now has a window that pops up that gives you a selection of data to display as the text. Some of the available options are:
- Area, Volume, Edge Length – Depending on what type of entity you anchor the label to, you can read different measurements from them.
- Component/Group Definition – The name of the group or component.
- Classification Data – With the Classifier tool, you can assign object types to components and define attribute values based upon a predefined structure, called a schema.
- Dynamic Component Data – Dynamic Components allow you to assign custom attributes, and create complex values calculated from a components’ size, position, rotation, material, etc.
Image may be NSFW.
Clik here to view.
Classifications
The key to being able to pull the information you want into a label is to create a component with classification data or dynamic component attributes. Classifications provide you with a standardized structure of text based attributes that you can add to components in your model.
Image may be NSFW.
Clik here to view.
The default classification schema that comes with SketchUp is the IFC2x3 schema. If you’re not familiar with the IFC filetype and workflow, you’ll probably find it a bit overwhelming. If this doesn’t make your head spin, then maybe this will ;P But, if you do use IFC in your workflow, you’ll now be able to import/export IFC models to all IFC compatible software.
Regardless, I see a lot of potential in the Classification tool in SketchUp, especially since they allow you to define your own schema, that is, your own object type and attribute structure. I’m chatting with a few people on Sketchucation about this process right now. It’s quite complicated at this point, but I’m hoping it will get simpler in the near future.
In the meantime, you can get started with adding data to your models using Dynamic Components.
Dynamic Components
Dynamic Components differ from Classifications in that they don’t follow a preset schema. But they have a ton of intelligent features that allow you to manipulate and control the component, as well as calculate some complex text values to bring into LayOut.
We’re not going to get into any of the complex functions of Dynamic Components right now, we’re just going to create a custom attribute, and assign it a value.
Image may be NSFW.
Clik here to view.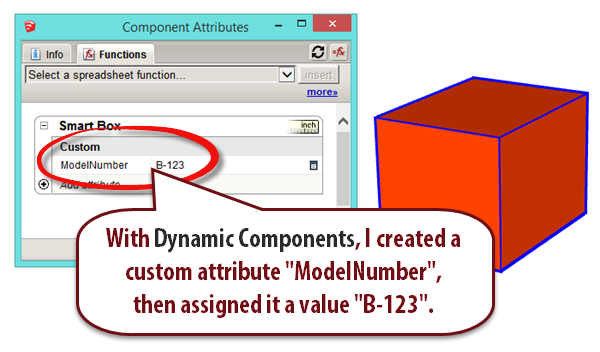
For this example, let’s create a simple box in SketchUp, and add a ModelNumber attribute. We’ll then bring the model into LayOut and read the value from the model,placing it in a label.
To add a custom attribute to a component in SketchUp, follow these steps:
- In SketchUp, draw a box. (It could be anything, but let’s keep it simple for this example.)
- Triple click to select the entire box, then press G to Make Component. Type in “Smart Box” for the component name. Click Create.Image may be NSFW.
Clik here to view.![create component]()
- Open up the Component Attributes window from either the dynamic component toolbar, or go to Window -> Component Attributes.
- You should see your component name, “Smart Box”, and underneath it you’ll see “Add attribute”. If you don’t see this, you need to make sure you have the component selected. The Component Attributes window shows attributes for the currently selected component. Click “Add attribute”.
Image may be NSFW.
Clik here to view.![add_attribute]()
- Type in ModelNumber for the attribute name (No spaces), then click inside the textbox and enter B-123 for the value.
Image may be NSFW.
Clik here to view.![set attribute]()
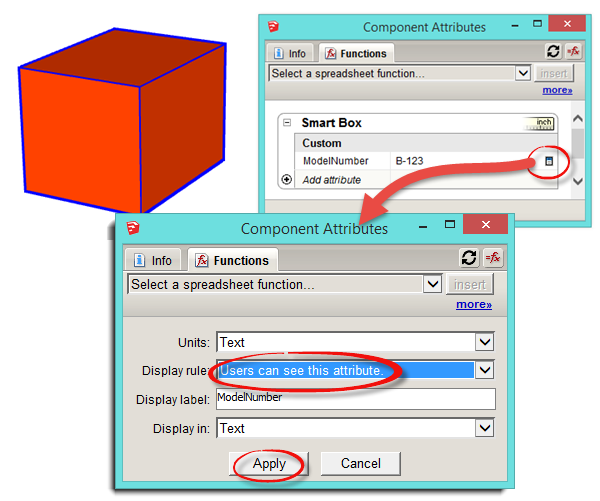
- Now that we’ve set an attribute for the component, we need to make it visible, so LayOut can “see” it. Click on the details icon, and set the Display Rule drop down to Users can see this attribute. Then, click Apply.
Image may be NSFW.
Clik here to view.![set visibility]()


That’s all you need to do to add data to your model. You can add as much data as you want. You can also use some of the preset attributes such as Summary, ItemCode, or description. Next, just save your model, then go to File -> Send to LayOut.
To read data from your SketchUp model using the Label tool in LayOut, follow these steps:
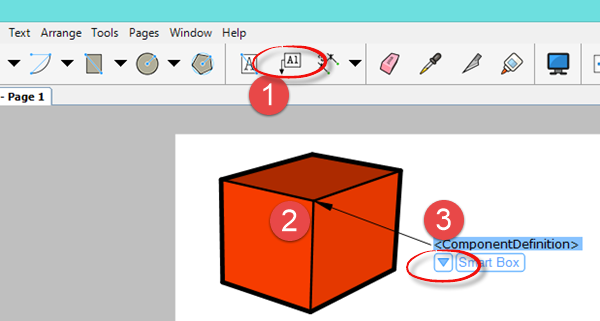
- In LayOut, activate the Label tool.
- Click once on the SketchUp object in the viewport to anchor the label to it.
- Double-click where you want to place the label text.
Image may be NSFW.
Clik here to view.![insert label]()
- The leader text will default to an auto-text. Click the drop down menu to access all of the auto-text tags available for selection.
- The left column will let you pick which entity you’d like to read data from, and the right column will show you all the available data.
Image may be NSFW.
Clik here to view.![choose data]()
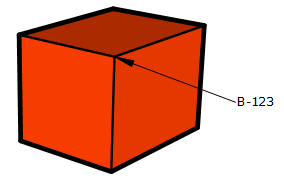
- Double-click on the ModelNumber attribute, and tap ESC to finish.
Image may be NSFW.
Clik here to view.![label]()

You can add more than one auto-text tag in the same label. You can also combine auto-text with regular text.
If you’d like to remove the leader from the label, just select the label, go to the Shape panel, and click on the stroke color swatch. Set the opacity to 0% and you’ll be left with just the label text. The leader will still be attached, you just won’t be able to see it.
If you’d like to learn more about the new features of SketchUp and LayOut 2015, I’ve just released an update to my book, SketchUp to LayOut. You can go to www.Sketchuptolayout.com to view and purchase for an instant download.
The post Pulling data into LayOut from your SketchUp model using Dynamic Components & Labels appeared first on www.MasterSketchup.com.