New in SketchUp 2015, the Rotated Rectangle tool gives you more control over the way you can draw rectangles in SketchUp. In this tutorial, I’ll show you how to get oriented with it.
It’s also impossible to draw a rectangle off-axis. You’re only able to draw rectangles that have edges aligned to the blue, red, or green axis. The Rotated Rectangle tool solves all of these issues.
Using the Rotated Rectangle tool
The Rotated Rectangle tool  is available in both the Getting Started toolbar, and the Large toolbar. (If you don’t have those toolbars visible, go to View -> Toolbars, and check the boxes for either Getting Started or Large toolbar.)
The fastest way to get started with the Rotated Rectangle is to simply treat it like a “3-point rectangle tool.” So, activate the tool, then click any three points to define the rectangle size. Don’t worry about the protractor helper that appears when you click the points right now. Just draw a few rectangles to get used to clicking 3 points, instead of 2.
What’s great about being able to define 3 points of a rectangle is that you’re not constrained to the axes anymore. Using the inference system, or locking alignment by holding the SHIFT key, allows you to draw your rectangle in any orientation you want.
Watch the full video tutorial below
Advanced Positioning controls
If you need more control over the positioning of your rectangle, you can specify an overwhelming variety of values while you’re drawing the rectangle. For example, instead of just clicking two points to define your first edge, you could break it down into multiple steps:
- Define a plane you want the edge to be on.
- Set the angle you want the edge to project from.
- Set the length of the edge.
On the first click, you have the option of dragging the mouse out, perpendicular to plane you’d like the first edge of your rectangle to reside on. This is really useful when you know the angle you want the edge to be at, because defining a plane gives you the ability to type in an angle in the VCB.
To use the advanced orientation features of the Rotated Rectangle tool, follow these steps:
- Click and drag your mouse perpendicular to the plane that you’d like your first edge to be on.
- With the assistance of the overlaid protractor helper, position your mouse to the angle and length of your first edge. Click to set the point, or, you can type in an absolute angle and length and press ENTER.
- With your first edge drawn, SketchUp now knows that your next edge has to be perpendicular to the first one, so it locks your cursor along that plane. You can then set the angle and length of your second edge.
- After your rectangle is drawn, you have the opportunity to redefine its size. Type in new dimensions, separated by a comma, and press ENTER. Type the dimensions in order from first edge, to second edge.
VCB input
As you might already know, SketchUp allows you to be precise with everything you draw by allowing you to type in dimensions as you’re using different tools. By keeping an eye on the VCB (Value Control Box) in the bottom right corner of your screen, you can tell when the opportunity arises to define values.
The Rotated Rectangle tool gives you numerous different opportunities to define values during each step of the drawing process. I’ve mentioned some of those opportunities in the steps above, but let’s review these in more detail:
Download my full Rotated Rectangle guide for free here (PDF 74kb)
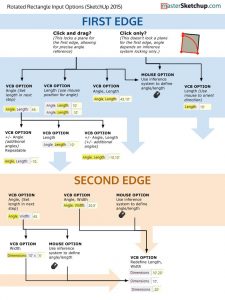
Click to Enlarge
- After you define the first point, you can type in a length for the first edge, or, if you had click and dragged to lock an alignment plane, you can type in an angle AND a length.
- If you know the angle for an edge, but not the length, type in the angle, followed by a comma, and press enter. This will lock the edge along that angle, allowing you to set the length separately.
- It’s important to pay attention to where you place commas when typing values for the VCB. Commas are what distinguish which value you’re defining.
- Once the rectangle is drawn, you have another chance to change the size of the drawn rectangle. It will keep its origin and orientation, and redraw its size based on the values you input.
- Using the Angle snap feature, you could orient each edge to the angle you want (ignoring the lengths), then type in the length and width once the rectangle is drawn.
The post SketchUp Rotated Rectangle Tutorial (New tool in SketchUp 2015) appeared first on www.MasterSketchup.com.