Materials are what allow you to apply an image to the surfaces in your model. Here are some tricks for working with materials in SketchUp.
SketchUp Materials & Textures
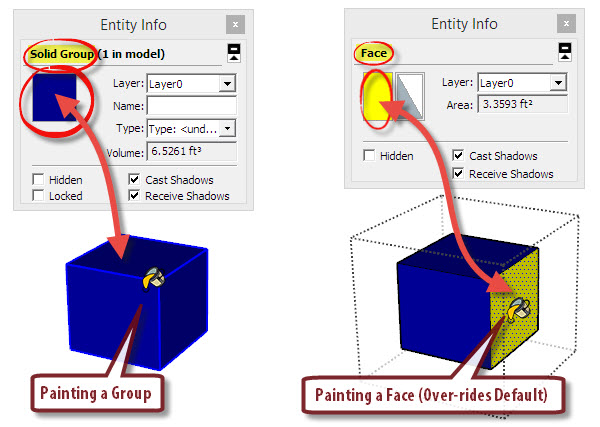
1. Painting Groups/Components vs. Faces
One subtle, but important distinction with the Paint Bucket tool (B), is whether you are changing the default material of a group/component, or applying a specific material to a face.
When you use the Paint Bucket tool directly on a group/component, you override SketchUp’s default White/Purple face colors for that object. (White is the default front color of a face, purple is the default back side. Remember, there are two sides to every surface?)
If you are directly editing faces (For instance, if you have double clicked on a group to open it for editing), applying the Paint Bucket tool (B) to a face will assign a specific material to it, and the default material will not apply to that face.
So, for example, let’s say you have a box in a group. You can color the entire box blue by using the Paint Bucket tool on the group to change its default face color. If you wanted to override the default color on a few faces, you could open the group, and assign specific materials to selected faces. Assigning materials to faces will always override default materials.
2. Positioning Materials
There is a hidden menu to help you tweak textures when you assign them to faces. (This doesn’t work for textures assigned as defaults to groups/components).
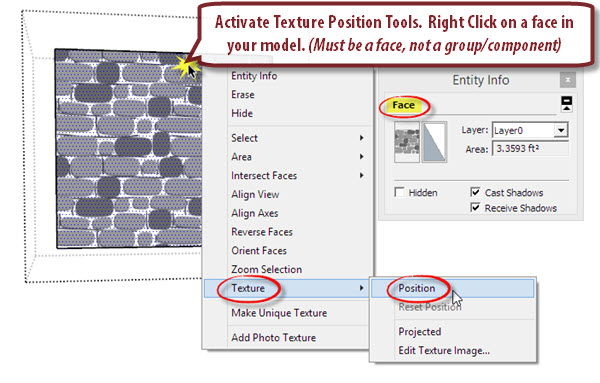
Just right click on a face, and select Texture -> Position. You’ll then see some controls appear on the material that let you adjust it. You’ll also see a grid superimposed over the face that shows you each tile of the image.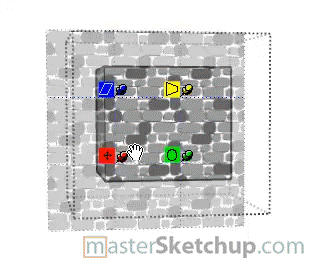
The red pin allows you to change the image anchor point. This pin will snap to SketchUp inferences, so if you need the image to start at a corner of the face, you can easily do that.
The blue pin and the yellow pin let you scale, shear, and distort your image. I don’t find myself using these too much, but it’s best for you to play around with them yourself to see what they do.
The green pin lets you rotate the image, and scale it proportionally.
3. Matching Material Positions to Multiple Faces
Sometimes, when drawing a house, I’ll draw the first floor and second floor exterior walls as separate groups, and hide the edges in between them in order to give the illusion that they are one single group.

In order for this illusion to work, the siding material applied to both faces must match up exactly, so there is a seamless transition from the first floor wall to the second floor wall.
To do this, apply a material to the first floor wall and configure the position and scale the way you want it. Next, activate the Paint Bucket tool, hold down ALT and click on the material to sample it.
Now, open up the second floor group and apply the material to the face. Since you sampled the first floor material, it tiles from the same anchor point and scale you specified in the first one.
4. Opacity

You can adjust the opacity (transparency) of any material from the Edit tab of the Materials window. Here are some good reasons to make your materials transparent.
- Trees and other plant objects add excellent detail to a model, but most times you don’t intend to have them cover up design elements completely. Making them semi-transparent is a great way to make sure they don’t do that.
- Aidan Chopra from SketchUp has this great trick for making walls see-through on one side only.
5. Changing Color of Texture
Sometimes you’ll find a great texture to use in your model but the color is not quite right. SketchUp includes some built in image editing tools to help you change the color, without having to edit the image in an external program. Diane from www.seeddd.com pointed this out to me during her presentation at the 3D Basecamp.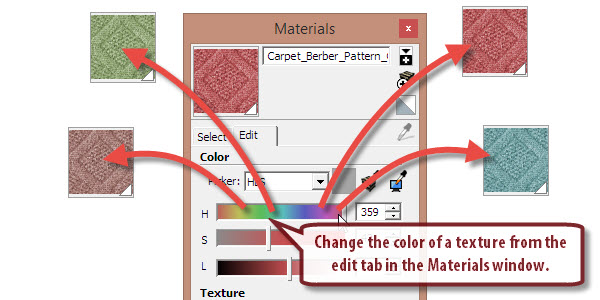
In the Materials window, go to the Edit tab, and select a different color from the color picker. Make sure you select the Colorize checkbox to lock the hue throughout the image to prevent any weird color anomalies from appearing.
For a detailed tutorial on editing textures in SketchUp, check out this excellent tutorial by Rich O’Brien from Sketchucation.
6. To tile, or not to tile?
Most textures included with SketchUp are set up to tile seamlessly. When a texture is applied to a face, it is tiled over and over in order to fill the entire surface. A seamless texture is an image that has been edited so that the edges of each tile blend into the next one to create the illusion of one large image.
However, Dave Richards, of whom I consider to be the expert at materials in SketchUp, takes a different approach with his woodworking projects. He finds it more accurate to take complete images of wooden boards, and he positions those images over the entire area of a face without it tiling. Check out his method here.
7. Style Affects How Materials Are Displayed
Every once in a while, I get an email from someone who says their textures are not appearing in their model. No matter how many times they paint they model with the texture, it just shows a solid color instead of the textured image.
What they don’t realize is that SketchUp has a few different face style settings and modes that affect how materials appear in the model. These settings don’t actually change any of the material assignments in your model, they only toggle different display settings to render your model differently. Remember, these settings are applied to your entire model.
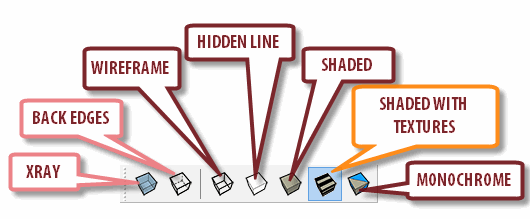
Style modes (Select one at a time)
- Wireframe - All faces are hidden.
- Hidden Line - Black & White mode. All faces are filled with the background color, and there is no shading to the model whatsoever.
- Shaded - All textures are converted to a solid color, and the model surfaces are shaded.
- Shaded with Textures - This is the only setting where texture images will display in your model. Faces show textured images if applied, and model is shaded.
Style settings (Can be toggled on or off in most modes)
- X-ray - All faces are semi-transparent, providing an “X-ray” view of your model.
- Back Edges - All edges obstructed from view are shown as dashed lines.
Do you have any tips for materials? Leave a comment below…
The post 7 tips for SketchUp Materials appeared first on www.MasterSketchup.com.