Moving and rotating objects in SketchUp are the most common manipulations you can do to objects. This article will show you the various ways you can rotate objects, and show you a few shortcuts as well.
Rotating objects is one of the fundamental tasks you perform while 3D modeling. In the spirit of simplicity, SketchUp comes with one tool for this task; the Rotate tool. But this one tool has many hidden features that can give you all the functionality you would ever need to manipulate objects in SketchUp.
You even have the ability to rotate objects without using the Rotate tool.
There’s a really handy shortcut for rotating groups and components using the Move tool. If you think about it, if you need to rotate an object, you’re probably moving it into position as well, so it’s really convenient to not have to switch tools if you don’t have to.
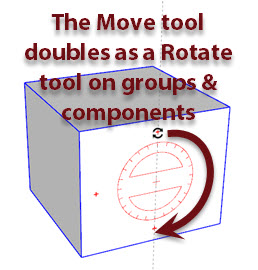
- With the Select tool (Spacebar), select the group or component you’d like to rotate.
- With a group or component selected (it should be highlighted blue), activate the Move tool by pressing (M) on your keyboard.
- If you hover over the object with the Move tool, you’ll notice a set of red crosshairs appear. Click and drag any of these crosshairs to rotate the object.
Rotating objects in this way will rotate them around their center point. If you need more control over how the object is rotated, you’ll need to use the Rotate tool.
Watch the full video tutorial below:
Hold Shift to lock plane reference
Sometimes it’s hard to get the Rotate tool oriented just the way you want it, especially when you’re trying to rotate something around a plane that is not on the green, red, or blue axis. In these situations, you can use other faces in your model to align the rotation plane.
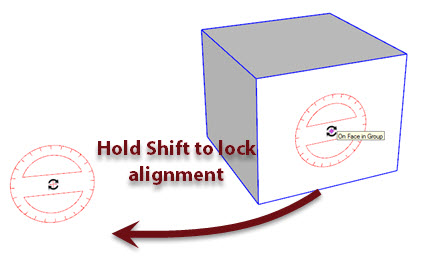
- With the Select tool (Spacebar), select the object you’d like to rotate.
- Activate the Rotate tool by pressing (Q) on your keyboard.
- Hover over a face in your model that is oriented parallel to the plane you’d like to rotate on then hold the SHIFT key on your keyboard.
- While holding SHIFT, drag your mouse to the point in your model where you’d like to rotate the object from. Click to define the center point.
- Click a point to start rotating from.
- Move your mouse to rotate the object, click again to finish.
Click and drag to orient rotation
Another way to align the rotation plane is to click and drag your mouse perpendicular to the plane you’d like to rotate on when you click to define the center of rotation.

- With the Select tool (Spacebar), select the object you’d like to rotate.
- Activate the Rotate tool by pressing (Q) on your keyboard.
- Click the point where you’d like to rotate from, but this time, hold down the mouse button and drag outwards, perpendicular to the plane you’d like to rotate on. Let go of the mouse once you’ve locked onto the rotation alignment you desire.
- Click a point to start rotating from.
- Move your mouse to rotate the object, click again to finish.
TIP As you drag your mouse out to align the rotation plane, pressing SHIFT will detach the Rotate tool from the center point, lock the alignment reference, and let you define a new center point for the rotation.
Create multiple copies
Just like with the Move tool, you can create multiple, equally spaced copies using the Rotate tool. This is great if you want to create multiple copies along an arc path.

- With the Select tool (Spacebar), select the object you’d like to copy.
- Activate the Rotate tool by pressing (Q) on your keyboard.
- Click once to define the center rotation point.
- Click again to start rotating.
- Tap CTRL on your keyboard to toggle “copy mode”.
- Move your mouse, click again to finish moving.
- If you’d like to make more than one copy equally spaced from one another, type
5* ENTERto make five copies, or5/ ENTERto make the copies within the range of the original movement.
Controlling the angle of rotation
The rotation will snap to preset angle intervals. If you’d like to change the units it will snap to, you can change that. Go to Window -> Model Info -> Units. Under the Angle Units section, make sure “Enable angle snapping” is checked, and set the angle interval to your desired number.

You can also define a specific angle manually. After you rotate an object with the rotate tool, type in the precise angle you’d like into your keyboard and press enter. The object will reorient itself to the angle you’ve specified.
You can rotate any entity in SketchUp
The last thing to keep in mind is that you can rotate or manipulate any entity in SketchUp. Not just groups or components. So you can rotate faces and edges, or any combination of both. SketchUp will automatically stretch out other connected entities in order to keep them connected to the objects your rotating.